Hi all!! I will skip unnecessary talks about Continuous integration, because there are thousands of pages that explain this things much better than me, so, if you need information about what is continuous integration or continuous testing, please follow the links provided, it’s a must read!! 🙂
So, let’s go to the point! You want to implement Continuous Testing (CT) in your company…. good! you’re in the right way to be a better tester! 🙂 let’s make some noise with our test cases!
When I started looking around with the possibilities I faced several problems, so this article is like a history about how I prepared all the environment, and how i solved the problems that I faced, and I hope it can save some time to you!
Phase 1: The tools?? nooo!! the strategy!!!!!
The first thing that most of the people do is to think with the tools needed… ok, this is important, but before that, you need to think about some points that are much more important, like:
- Do you have a sponsor? You will need someone else than you that believes in CT, that understand the benefits, and that will defend your idea. Typically, this guy is your boss!
- What will you do with the test results? Imagine that you have implemented CT and every week you execute a set of test cases… do you have someone from the test department that can review that test results? and someone from development that can fix the defects? It seems a silly question, but if the answer is “no”, then probably you are not prepared for CT.
Phase 2: The tools! yeah!!!
Now is the moment! let have a look on the tools!! there are many, many tools, and for sure many people will think that Jenkins is not state-of-the-fucking-art, that ALM is a proprietary tool, and you should better use selenium or whatever opensource super-fancy tool…. but, hey, that’s my fucking blog! I decided to use jenkins as the task scheduler because is stable, runs fine, has lot of support from the community… and I decided to use ALM+UFT because I already have hundreds of automated Test Cases in that environment, it works fine and it has (average) support.
My recommendation is to use something that has community support, something that you know that works, and do not try to try strange things… remember that the objective of testing is to be helpful for the projects and add value, so please, make things easy!
Phase 3: Hardware
You will need a dedicated server for Jenkins (the task scheduler), you can use that server for executing test cases, but it’s not recommended, you can do a mess on the server. The nodes are the executors that will be called from the Jenkins server, the more nodes you have, the more test cases you can execute in parallel, it sounds great, and it is! (well, you will need one UFT license per node, or course… $$ ¬¬’)
So, at least you need a server and a node (2 PC’s). The server can be virtualized, physical, in the cloud, whatever! the node…. meeeehhh, it has some problems limitations when is virtualized, but it works. If you can have physical PC’s for the nodes, the better! we will talk about that later.
Phase 4: Configuring the server: Jenkins
Jenkins is very easy to install, just download and “next, next, next…” easy!
Once installed, go to “Manage plugins” and install the “HP Application Automation Tools” plugin, it will do almost all the work and will allow you to connect your Jenkins with your ALM server, and run UFT test cases on your nodes. It allows also to run Load Runner tests, and much more, but I have not used that functionality yet 😛
The configuration of the plugin is quite simple, and very good specified in their own link, so it’s better if you follow this process:
- Set up the ALM connection in jenkins doing this.
- Go to ALM, and prepare a Test Set with some UFT automated test cases, and copy the full path where the test set is located
- Now you need to create a new scheduled job in Jenkins. This job will call ALM for executing some test cases in the Node, ALM indirectly will call UFT for doing all the job. All the info for creating a new scheduled job can be found here. Here you have some recommendations about the scheduled job:
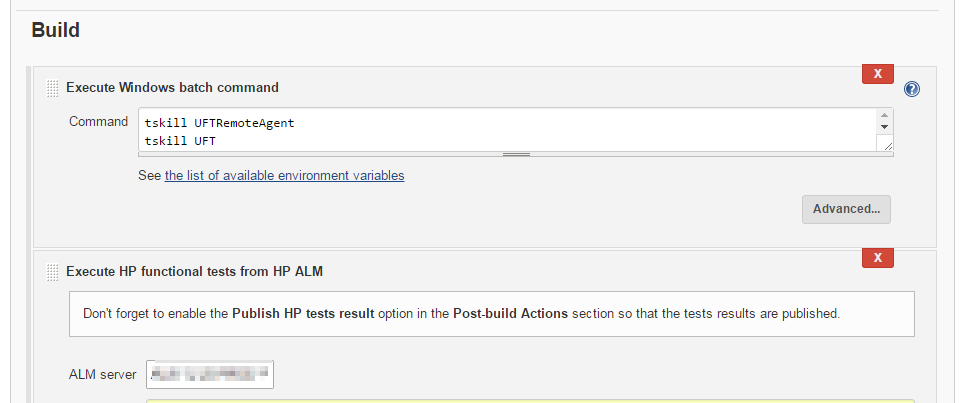
- Before the build step “Execute HP tests from HP ALM” I recommend to add a previous build step that will kill any other UFT instance, it will allow us to have a “clean” environment. For doing this, you just need to add a “Execute Windows batch command” with the commands “tskill UFTRemoteAgent” and “tskill UFT” as shown here:
- In the build step “Execute HP functional tests from HP ALM” set a reasonable timeout, don’t leave that at “-1”. This will prevent you to wait forever if something fails on your tests.
- In the same build step, leave the “Run mode” to “Run locally”. It will mean that the node will execute the test cases, which is the most common case.
- Set another “Post-build action” for sending the an email with the results of our testing, the task is called “Editable Email Notification Templates”. I strongly recommend the “Email-ext Template” plugin for doing this. We will talk about the configuration of that plugin later, but its REALLY powerful to send the results of the test cases via email!
Done!! we have configured our server and the task to run the test cases, but before running the task, we have to prepare the Nodes!
Phase 5: Configuring the node(s)
The nodes will be the ones that will do the “hard work”, they will be called by Jenkins and will execute the UFT test cases, will collect the results, and will send it back to ALM. The more nodes you have, the more parallel executions you can do!
Creating a Node is quite easy, you just need to follow the instructions from Jenkins: basically we just need to install Java on the node and execute a small JNLP agent, but then, the problems start!
- For executing the JNLP agent you need to be logged into the machine. Ok, it can be installed as a service, but then the HP ALM plugin will not work (or at least, it was not working when I was writing this article), so better forget about the service.
- In order to execute the JNLP agent automatically you just need to write a BAT file calling the java sentence given by Jenkins, and execute the BAT file when the machine starts. It’s pretty simple, but in some corporations it can be a problem, because most sys-admins does not allow the automatic login, so this means that you will need to login to all your nodes each time the machine is restarted, or it will never start the JNLP agent… 🙁
- If you have linux machines I think that you will not have that limitations, but this is not the case, since UFT does not run on linux! 😛
- In the Node you need to install UFT and the ALM plugin, which is obvious! my recommendation is to do a simple test once all is configured: Open ALM, check that the client is registered properly, and execute an UFT test in order to make sure that all runs fine on that node.
- Disable screen-savers, energy-savers, and this kind of things in the nodes!
- Allocate a generous amount of RAM in the nodes, minimum 3Gb each! Java and UFT are RAM eating monsters!
And…. BOOOOM!!! 3 nodes have appeared!!!! yeeeeeeeha!!!!

Phase 6: Making it nice (1): Configuring the email reporting
Face it, without nice dashboards and emails, you will not success! the basic idea is to give the right information to the right people, so, why not sending an automatic email to the ones that have to review the results once the test cases are completed? sounds nice isn’t it? then your plugin is “Email-ext Template Plugin” (Email ext Template)! This plugin allows us to prepare multiple email templates that will use the Groovy syntax to collect the results. Don’t worry, I will provide 2 valid templates for doing this. So, let’s move on, in order to configure the plugin you should follow some basic instructions:
- In the Jenkins server, you create a folder called “email-templates” under the jenkins installation folder, and place there the templates you want to use. Here you have 2 examples (pending!), but feel free to modify it according your needs! (in fact, I ripped them from some website that now I can’t remember… :P)

- Then go to “Manage Jenkins –> Editable Email Notification Templates” and create at least one template. The template will call one of the 2 groovy files that we have, so you can create 2 templates, one for each groovy file.
- The first template will be a “short version” and will use the “test_results.groovy” file. Suitable for people that just need to be informed.
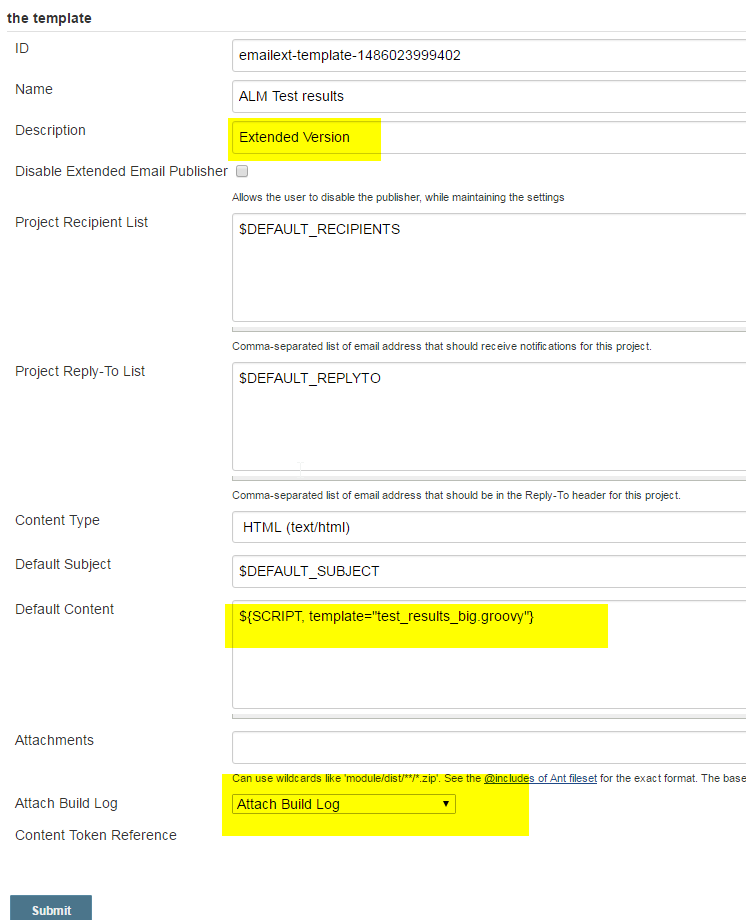
- The second template will be an “extended version” and will use the “test_results_big.groovy” file, with more details about the failing test cases, the log file, etc… Suitable for developers and people that need to do a deep dive on the defects.
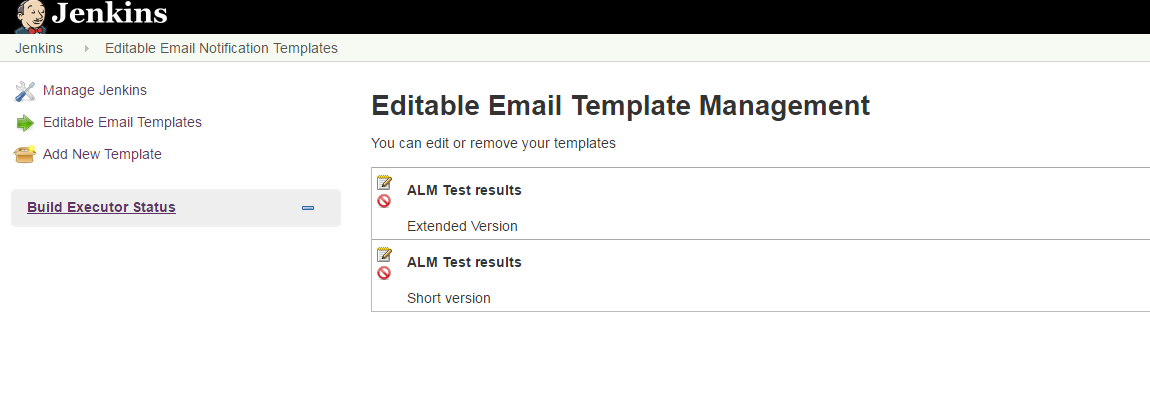
- And remember to call the groovy script in the template 🙂
- Remember that in the job, you need to specify that an automatic email should be sent:
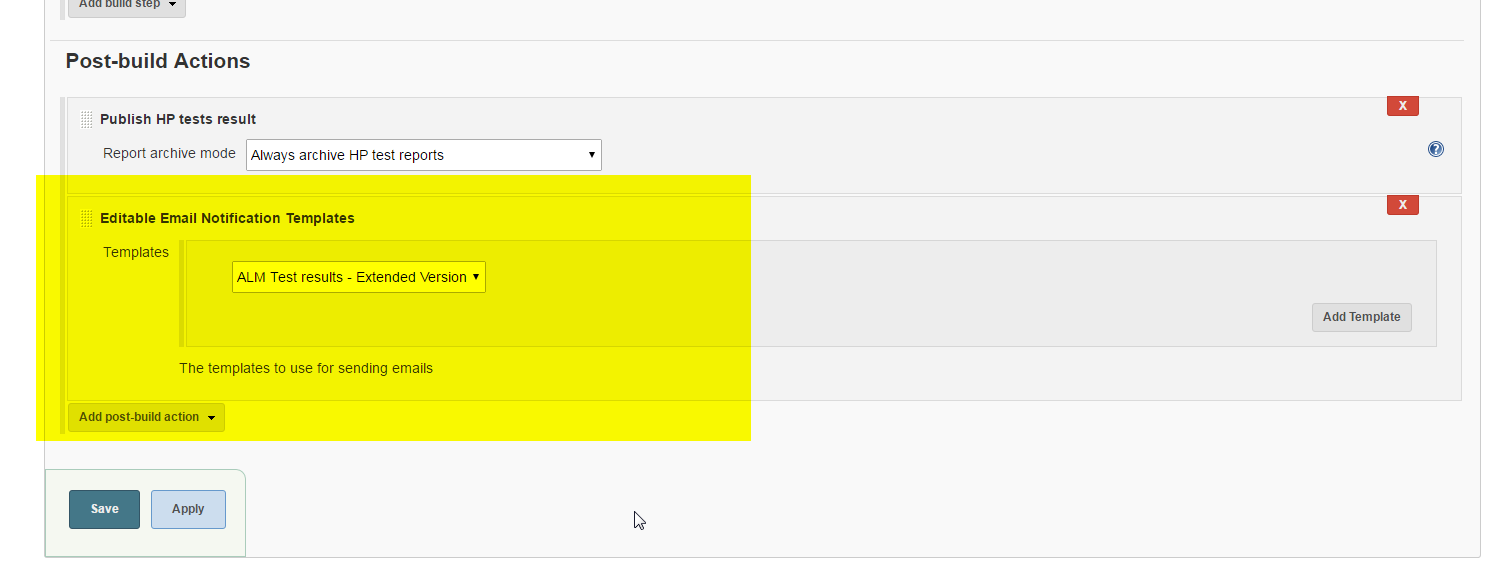
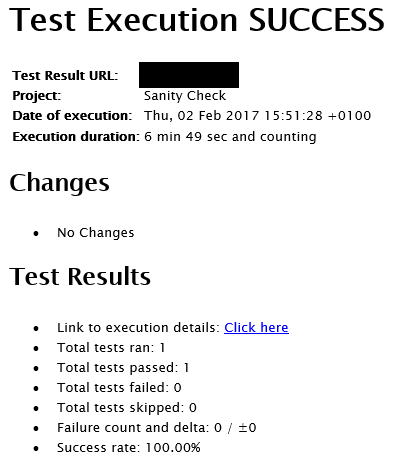
- And… voilá!!!! automatic emails sent after any execution!!!
Phase 7: Making it nice (2): Configuring the dashboard
The last step should be to prepare the dashboard, but this is quite easy and simple, even though, here you have a few recommendations:
- Install the “Test Results Analyzer” plugin. It will give you more detailed information about the test executions, like the time elapsed on each execution, etc…
- Install the “Mashup Portlets” plugin. It provides some nice tables to display the test results 🙂
- Play… play a lot and check which is the best way to show results! there is no “good” or “bad” way to do it, just choose the best that fits your business!
Happy testing! 🙂
